Thursday, May 26, 2016
Finishing my FMP
I've just finished my Final Major Project this week, subsequently I've been concentrating all of my energy on the final touches to that and haven't had chance to post an update on the progress of my professional brief projects yet. The contents of my FMP can't be talked about because of it's involvement with BMW, however I can say that it was marked yesterday by my visiting tutor and the feedback was all positive.
Sunday, May 15, 2016
Stylised Prop - Gravity Karts, Modeling Kart 3
Kart 3 is now modeled. The model took a little longer than the second as not so many of the components are transferred over between this upgrade.
Following the same pipeline as the other karts has meant that some elements of this model might be unnecessary. For example, from wanting to use tiling textures it's meant that I have had to make separate planes to house alphas of the studs featured on metal sheets, as it would be too hard/impossible to calculate the studs to fall in the right place on mesh if they were painted them into the tiling texture.
After culling some of the unnecessary geometry to get the best triangle count for each kart, all 3 are now ready to be textured. Hopefully texturing shouldn't take too long as I have most things in place to simply slot the tiling textures into the MultiSub material, the only UV work will be in overlaying the unique components to their textures and everything else can be quickly unwrapped to the tiled texture space.
 |
| 3dsMax Viewport with Skylight |
 |
| Wireframe |
 |
| Colour Ink Shader |
 |
| Original Concept |
After culling some of the unnecessary geometry to get the best triangle count for each kart, all 3 are now ready to be textured. Hopefully texturing shouldn't take too long as I have most things in place to simply slot the tiling textures into the MultiSub material, the only UV work will be in overlaying the unique components to their textures and everything else can be quickly unwrapped to the tiled texture space.
 |
| All 3 Gravity Karts with triangle count |
Saturday, May 14, 2016
Stylised Prop - Gravity Karts, Modeling Kart 2
The second kart was slightly quicker to model as I could re-use some of the elements from the first kart, which also gave me reference points for scaling the rest of the elements to. I've executed the model using the same principles as the first kart, doing most of the leg work for texturing in the seperation of different elements through material ID's and allowing for unique surface details to be modeled rather than painted to keep the method of filling each element with a simple tiling texture intact.
To get the most out of both the texture budget and triangle allowance, I've delegated certain details to be modeled and others to be faked in the texturing. For example the white planes highlighted below will be alphas featuring details. If I modeled these details instead it would meen adding further tiling textures to the list and would probably push me over the limit of triangles as well, so it's more efficient to keep these as projected details on planes, which from the distance I'm assuming the player camera will be from the karts it wont be a noticeable difference.

One scaling issue I had with this kart is with the wood barrel at the back. I'm assuming the concept artist was intending the barrel to look like it's sat on the kart floor, however if I did this with my model the pitch of the planks leaning against it to form the hut like shape was too high and made the kart look very back heavy in its composition, so I decided to have the barrel slightly sunken into the karts frame to keep the overall visual ratio's the same.
Knowing what to do with the rear view of the karts was also an obstacle, but I feel I've managed to keep the overall aesthetic for each upgraded version the same, making each iteration cleaner and more refined.

 |
| 3dsMax Viewport With Skylight |
 |
| Wireframe |
 |
| Colour Ink Shader |

One scaling issue I had with this kart is with the wood barrel at the back. I'm assuming the concept artist was intending the barrel to look like it's sat on the kart floor, however if I did this with my model the pitch of the planks leaning against it to form the hut like shape was too high and made the kart look very back heavy in its composition, so I decided to have the barrel slightly sunken into the karts frame to keep the overall visual ratio's the same.
Knowing what to do with the rear view of the karts was also an obstacle, but I feel I've managed to keep the overall aesthetic for each upgraded version the same, making each iteration cleaner and more refined.

Wednesday, May 11, 2016
Stylised Prop - Gravity Karts, Modeling Kart 1
I'm flying through the modelling process and i've already got the first Kart completed today.
 |
| 3dsMax Viewport with Skylight |
 |
| Wireframe |
 |
| Colour Ink Shader |
Modelling has been fairly easy due to the simple shapes. The hardest part was matching up the scale by eye and realising which components of the concept are in keeping with the perspective and which parts need to be rescaled.
Components like the wheels which should normally be one object, i've seperated into different meshes to allow for the eventual application of the toon outline effect which I've seen is possible in SketchFab. Having every component that's outlined in the concepts as separate meshes means I can tackle the texturing slightly differently aswell. Instead of unwrapping everything to one sheet and texturing from there, I'm going to break down the painterly materials into multiple tiling textures and rely on separated geometry and surfaces broken up by material ID's to achieve the look.
 You can see already that just through colour picking from the materials in the concepts and applying them to the divided material IDs on the components, that the base values are in place. All I need to do now is paint tiling textures and plan a way to efficiently group the unique textures such as the tree trunk spirals and rope.
 I'm hoping that by using the geometry for details such as the cuts in the wood, I will be able to have higher quality textures overall and not have to focus on pixel painting those details.
One problem I do have at the minute is with the Normals on the Vases, it's not really that noticable from the screenshot but in the 3dsMax viewport the Normals seem to have weird shadowing issues along the edges where the vertices meet. I've tried resetting and correcting the Normals and it isn't fixed with smoothing groups either so i'm hoping it becomes eradicated when I import to Sketchfab.

Components like the wheels which should normally be one object, i've seperated into different meshes to allow for the eventual application of the toon outline effect which I've seen is possible in SketchFab. Having every component that's outlined in the concepts as separate meshes means I can tackle the texturing slightly differently aswell. Instead of unwrapping everything to one sheet and texturing from there, I'm going to break down the painterly materials into multiple tiling textures and rely on separated geometry and surfaces broken up by material ID's to achieve the look.


One problem I do have at the minute is with the Normals on the Vases, it's not really that noticable from the screenshot but in the 3dsMax viewport the Normals seem to have weird shadowing issues along the edges where the vertices meet. I've tried resetting and correcting the Normals and it isn't fixed with smoothing groups either so i'm hoping it becomes eradicated when I import to Sketchfab.

Tuesday, May 10, 2016
Stylised Prop - Gravity Karts
Out of the small 3 week projects available to chose from, I have chosen to do a prop from the stylised category. The reason I've chosen to do a stylised asset is because after the realistic rooftop i'd like to experiment with something more playful in terms of the scaling and texturing.
The brief in short explains that the concepts for the Gravity Karts are already provided and we have to reproduce whats seen in the concept into a 3d model, we are only allowed to use 1x 512x512 texture sheet and 3k tris for each concept. There are 3 - 4 concepts to model depending on how quick you are to complete each one.
The concepts are as follows...
 |
| Stage 1 |
 |
| Stage 2 |
 |
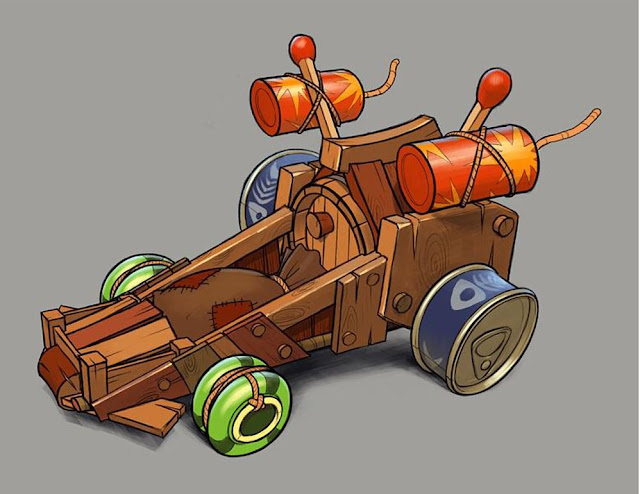
| Stage 3 |
 |
| Stage 4 |
The principle is that each stage is an iteration of the Karts upgrades. Stages 1, 2 and 3 have shared elements between them, which if factored into the modelling process, will save me some time. A hard part of the work will be to correctly match the scale of the Karts, as I get the impression the concepts are only suggestive of how the elements are scaled together and not necessarily calculated in terms of the perspective and proportional feasibility. I think some artistic judgement will come into play when replicating the model proportions, the textures however I'm sure I will be able to keep pretty close through sampling colours and copying surface definitions.
Monday, May 9, 2016


Sunday, May 8, 2016
Realistic Basketball Court - Final Fixes and Reflection

After fixing the problem on the glass (which was caused by a stray godray plane not being unchecked for casting shadows) I'm calling the environment done, as I need to move on to the other projects.
I've rendered a movie in UE4 using the matinee editor to show off the lighting and reflections that don't come across in the stills. I've also added small animated elements to some of the assets to bring the scene to life for the flythrough, I just need to find a way to upload it as my internet connection is terrible.
On reflection there are some things that I didn't fulfill with the environment and might still change if I have time. Firstly, the ladder on the side of the building was modeled for the intention of the player being able to climb up onto the roof, to increase the playable area, however the triangle budget didn't spread out enough to allow me to populate the roof with the same detail. Also having the roof as a playable area would mean I would have to create a believable way to fence the player in so as not to walk off the edge.

Another notable change I would make in reflection is that most of my props are small in scale and one of the cool things about the reference is the random larger objects found scattered around. Something I should have focused on modelling in hindsight, as I think the center floor of the court is lacking a focal point and most of the interesting compositions now come from the edges and buildings.


Subscribe to:
Posts (Atom)