Thursday, April 28, 2016
Tuesday, April 26, 2016
Realistic Basketball Court - Texturing, Using Substance Painter

One of the benefits of being able to paint straight onto the mesh is how quickly you can fake details. In the image below I've managed to quickly give the impression of bolts in the supports by simply painting height information into the separate channels available. Also, painting straight onto the mesh allows you to see directly how details like damage are working with the mesh and the lighting, for example the subtle scratches on the edges would have taken some back and forth between Photoshop and 3dsMax to achieve, however I was able to replicate it in seconds with Substance, and UV seems are no longer an issue either with being able to paint over them.

To begin texturing each asset I had planned the texture sheets and grouped the meshes accordingly, having a separate file for each group and working on one sheet at a time, I.e 'Metal' assets or 'Brick and Stone' assets, allowing for a clear layer tree with shared overlays for universal material properties.

One great thing about Substance Painter is that you can scale up or down the texture size at any point without loss, so I was working mostly with 4k materials to help see painted details and then scaling them down on export. Also For efficiency I combined the grey scale textures sheets where possible into the different channels.
One problem that arose later down the line in my plan of texturing the whole environment with Substance was; that whilst the scope for texture variation for each material was fantastic for creating the look of unique grunge and interesting areas of damage, the resolution of the textures were poor. For example in the images below, the brick featured underneath the plaster wasn't so noticeably low resolution in Unreal Engine, however because the UV's were confined to the 2048x2048 I allowed for this particular mesh the brick outside was the same pixel density and looked very noticeably low res with there being so much of it on display.


However, as you can see it didn't do much good. It's obvious that i'm going to have to create a tiling brick texture for this. The reason I didn't take this route to begin with was that I thought I might be able to save myself some time, instead of needing to make decals to break up the large plains of bricks, I used Substance to paint graffiti and dirt over the mesh, with the wider intention of making the whole environment look unique and non uniform.
I realise now that I've been neglecting the traditional methods of texturing that I know work just fine, such as using tiling textures where possible. Substance Painter is fun to use but should only be used for texturing unique assets, not an entire building.
Saturday, April 23, 2016
Realistic Basketball Court - Essential Meshes Finished
After working with the scaling I've been able to quickly block out some of the other features and focal points that I liked from the reference images i'm using. However I've begun to realise that the metal frame is going to be difficult to keep modular and tillable, the doorway either side already creates a unique tillable piece and with the asymmetrical features I'm intending to add it might be the case that I divide the frame up into larger modular pieces, to allow me to keep the random variations of damage and such to break up the frame silhouette.

It's my intention to try and keep the models as close to the reference as possible, however in some areas I've been forced to deviate from the real version to allow for better player experience and level design. For example in the image below, I'm sure these struts are needed for the structural stability of the frame, however adding them would mean cutting off a large portion of the playerable area.

Creating the feeling of natural and man made wear and tear is essential for the overall aesthetic i'm trying to create with this level. As I've been modelling i'm beginning to allow room for interesting focal points, by creating a clean mesh and then evaluating where it might be damaged and how this would factor into a composition.

 I'm also aware of the timescale, so I'm trying to plan ahead for unwrapping/texturing and making sure to reuse assets where possible.
 The triangle budget has shot up quite fast, which is surprising because I have been optimizing the meshes as I go, with only the surfaces the player will be able to walk up to having the majority of the budget dedicated to it. However I'm not too worried about going over the budget at the minute because I know that the reason it's so high at this early stage is due to the metal frame being the scale it is, with all the runs and joints being modeled it soon adds up despite them being low poly. Some of the joints are only a 'nice to have' for the realism of the frame and not essential to the overall silhouette, especially the ones at the top of the frame, so they are definitely on the hit list if I need to cut back later.

I'm hoping that that interior spaces wont look too boring as they really are just four walls and I haven't got many triangles spare to justify modelling details such as cracks or loose bricks, I'm intending to fake these details with the Normals and possibly Displacement maps.


It's my intention to try and keep the models as close to the reference as possible, however in some areas I've been forced to deviate from the real version to allow for better player experience and level design. For example in the image below, I'm sure these struts are needed for the structural stability of the frame, however adding them would mean cutting off a large portion of the playerable area.

Creating the feeling of natural and man made wear and tear is essential for the overall aesthetic i'm trying to create with this level. As I've been modelling i'm beginning to allow room for interesting focal points, by creating a clean mesh and then evaluating where it might be damaged and how this would factor into a composition.
 I'm also aware of the timescale, so I'm trying to plan ahead for unwrapping/texturing and making sure to reuse assets where possible.
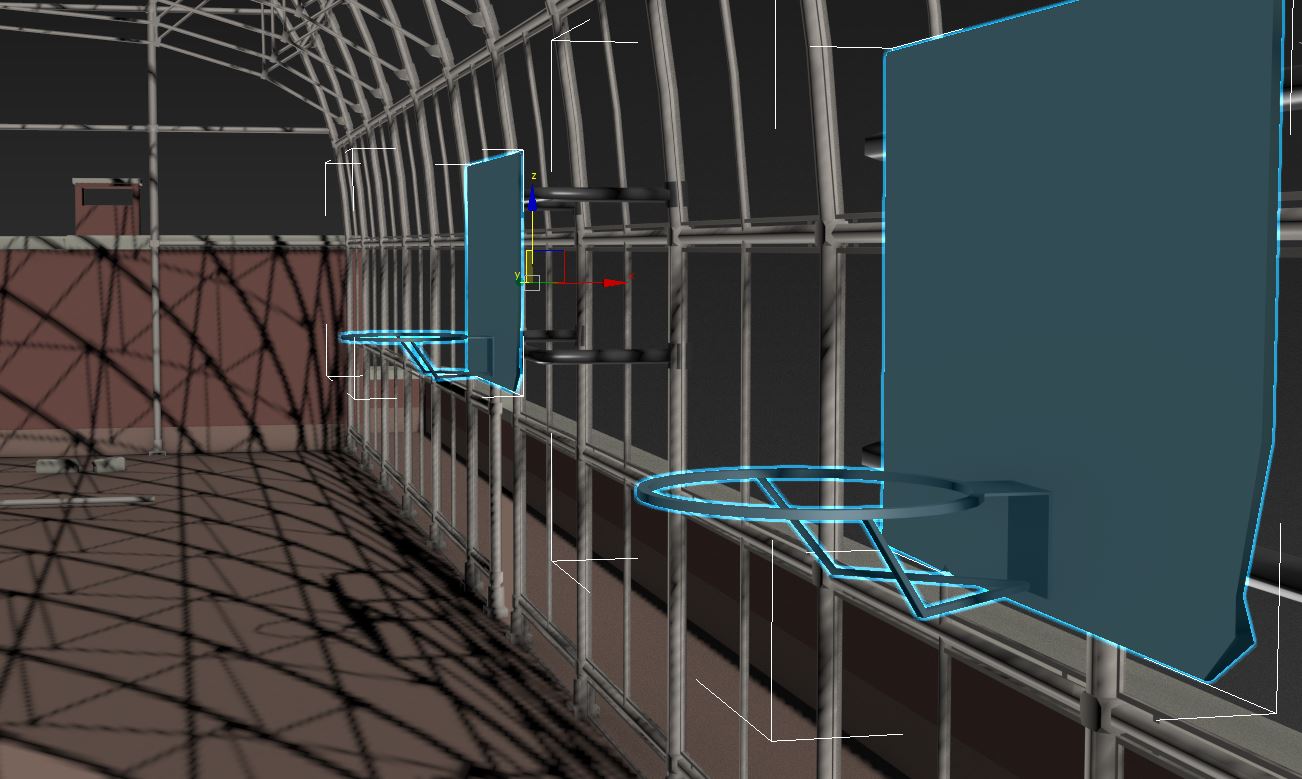 The triangle budget has shot up quite fast, which is surprising because I have been optimizing the meshes as I go, with only the surfaces the player will be able to walk up to having the majority of the budget dedicated to it. However I'm not too worried about going over the budget at the minute because I know that the reason it's so high at this early stage is due to the metal frame being the scale it is, with all the runs and joints being modeled it soon adds up despite them being low poly. Some of the joints are only a 'nice to have' for the realism of the frame and not essential to the overall silhouette, especially the ones at the top of the frame, so they are definitely on the hit list if I need to cut back later.
I'm hoping that that interior spaces wont look too boring as they really are just four walls and I haven't got many triangles spare to justify modelling details such as cracks or loose bricks, I'm intending to fake these details with the Normals and possibly Displacement maps.

I'm nearly finished with the essential meshes of the scene and I'm mentally preparing them into material groups to help me think how to divide the 4x 2048x2048 texture sheets.
Thursday, April 14, 2016
Realistic Basketball Court - Modeling/Scaling
I have now started to model the metal frame of the basketball court, working in cm I've tailored the frame towards the standard First Person Player height in Unreal Engine, I'm testing the door height in engine and using this as a scale reference for everything else that needs to be modeled.


Getting the correct looking curvature for the frame proved to be more difficult than I thought and I had to use a cylinder with a matching number of sides to get the correct spacing and angle between each frame segment.


Getting the correct looking curvature for the frame proved to be more difficult than I thought and I had to use a cylinder with a matching number of sides to get the correct spacing and angle between each frame segment.
Wednesday, April 13, 2016
Realistic Basketball Court - Concept
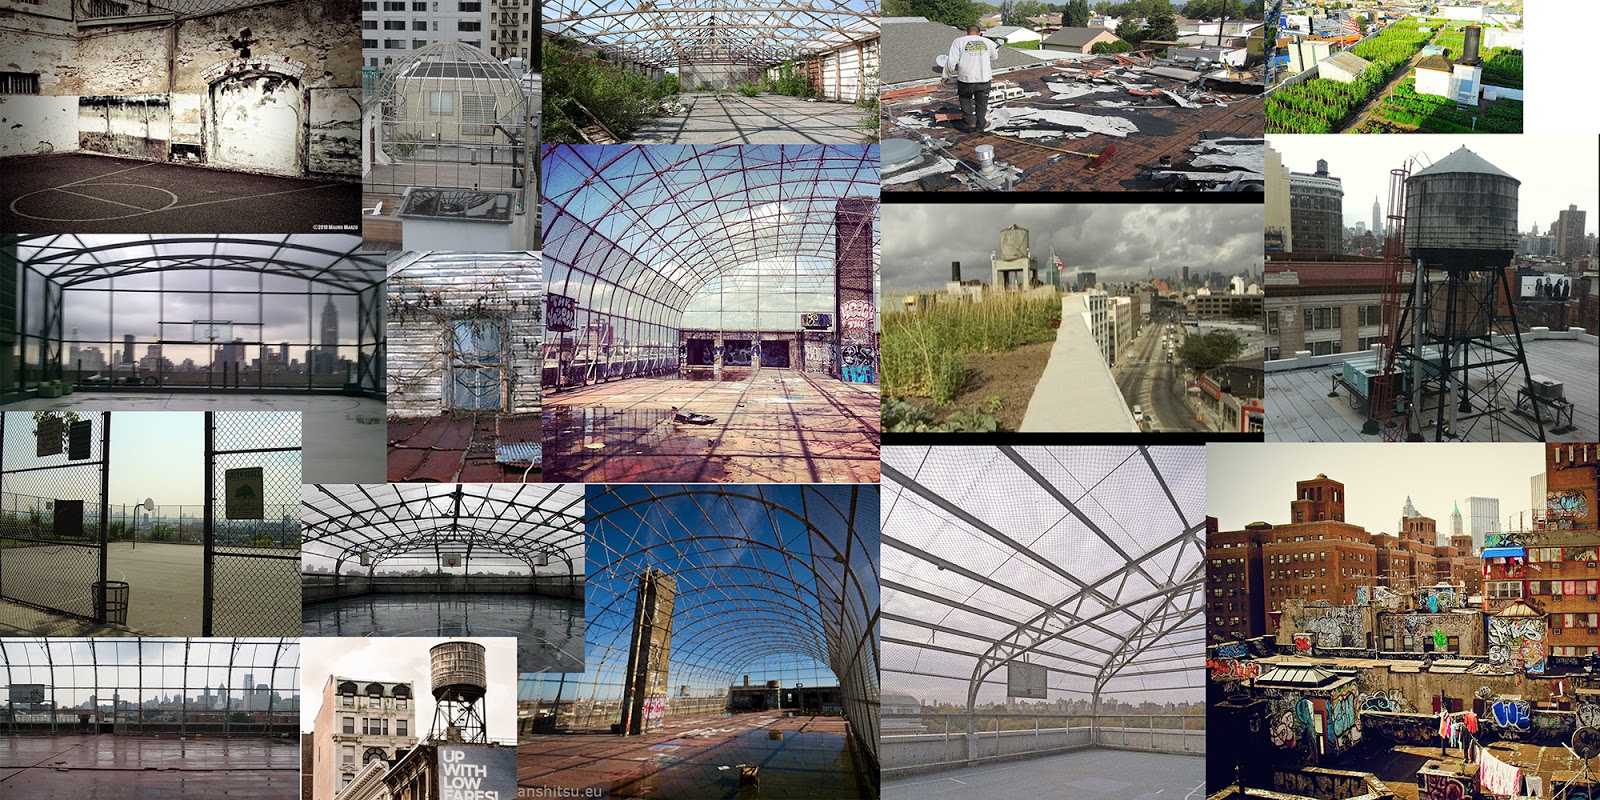
After finding reference of basketball courts and looking at things like natural wear and tear on objects that are in constant exposure to the elements, I began to compile my favourite pictures and produced a concept to help me figure out the scaling and get an idea of the modular pieces I could make.
 The sketch is based heavily on the basketball court image seen in the top right of the moodbaord above, as it already shows a lot of the elements I wish to replicate.


I've also started to look into which direction and can take the mood and lighting. I would love to give the impression of the court being flooded with city smog with the surrounding neon lights gleaming through it. It will have just rained in my scene, allowing the composition to seem more cluttered than it is, with the metal frame and the city lights being present twice.
It was my original intention to model the scene as it appears in my concept, with it being dissected down the middle, more of a diarama/aesthetic goal for a bigger scene. I wanted to focus on creating a a well populated level slice, but after getting feedback on my ideas it was suggested to add more cover and I was reminded that this is supposed to be a game ready environment for a first person shooter.
Acting on the feedback, I decided to try and create the whole rooftop. This wasn't so much of an issue in terms of the design because the scene is already visually modular and I could essentially build the second half with the existing half, however populating such a large area to the same standard I was planning would be difficult. The triangle budget for the brief is 50,000, which seems fairly generous now, but i'm sure i'll be struggling to make the level look as grungy and wrecked as I intend later down the line.
 The sketch is based heavily on the basketball court image seen in the top right of the moodbaord above, as it already shows a lot of the elements I wish to replicate.

I've also started to look into which direction and can take the mood and lighting. I would love to give the impression of the court being flooded with city smog with the surrounding neon lights gleaming through it. It will have just rained in my scene, allowing the composition to seem more cluttered than it is, with the metal frame and the city lights being present twice.
It was my original intention to model the scene as it appears in my concept, with it being dissected down the middle, more of a diarama/aesthetic goal for a bigger scene. I wanted to focus on creating a a well populated level slice, but after getting feedback on my ideas it was suggested to add more cover and I was reminded that this is supposed to be a game ready environment for a first person shooter.
Acting on the feedback, I decided to try and create the whole rooftop. This wasn't so much of an issue in terms of the design because the scene is already visually modular and I could essentially build the second half with the existing half, however populating such a large area to the same standard I was planning would be difficult. The triangle budget for the brief is 50,000, which seems fairly generous now, but i'm sure i'll be struggling to make the level look as grungy and wrecked as I intend later down the line.
Tuesday, April 12, 2016
Realistic Roof-Top Project
After a bumpy start and a few more hurdles before I finally got settled in Munich and started work at BMW again, I was admittedly rather behind on the Professional Brief projects that I had been set alongside the work placement. Also due to starting my Final Major Project/Bachelor Thesis early to adhere to my contract length at BMW, my time delegation for the Professional Briefs became varied hence only starting to properly execute the projects now.
Before christmas I chose the 'Metropolis Roof-Top' brief as my first project of the three we were assigned. The small projects, lasting three weeks each, were designed to be representative of the sort of briefs we should expect to see in the professional industry.
I chose the realistic rooftop for multiple reasons; firstly because I have an interest in environment creation, secondly because the majority of games I find appealing are those that try to emulate realism, and thirdly because I had been out of the game art loop for a while whilst working for BMW I hadn't really had any experience of Unreal Engine 4 yet and I felt the best way to delve into the alien PBR pipeline was to focus on replicating real world materials.
I began R&D for the project immediately and a choice quickly presented itself. Whether to try and achieve a pristine aesthetic, something of the likes of a James Bond scene

I chose to go forward with the grungy aesthetic as I felt like it could offer a lot more scope for interesting textural work, and with programs like Substance Designer becoming more prevalent over the past year I understood that there were some favorable tools to be implemented that I hadn't had chance to use yet.
From riffling through reference I became drawn towards to the idea of making a rooftop basketball court. The verticallity of the framework would allow for some visually pleasing compositions and I could already begin to envisage the wonderful scope for debris and material properties present in such a scene.
Friday, October 23, 2015
Getting my head back in the game
For the last 13 months I have been working as in intern for BMW in Munich - Germany. This has taught me a lot and helped widen my horizon within the uses of CG. I worked for the 'visualization' department. Within the overall design process of a car our department is in charge of envisaging and developing the desired aesthetic of the car, allowing our clients and bosses to see their designs in realistic situations using high end CG rendering software, enabling them to move forward with or reevaluate design choices. The visualization team at BMW uses many different pipelines and programs to achieve the desired look of the car model, whether it's interior or exterior that is being focused on we are in charge of cleaning the meshes, making and applying physically based materials to the model, focusing on lighting and presentation and rendering quality animations, films and still beauty shots. Some of tasks I was involved in also meant utilizing my 3D modelling and texturing skills, examples seen below.


Now I am returning to Game Design. Which is something i'm looking forward to get stuck into again.


Now I am returning to Game Design. Which is something i'm looking forward to get stuck into again.
Subscribe to:
Posts (Atom)